Table of Contents
Welcome to OA Mobile SupportContactsProspectsLeadsCalendarNew AppointmentReschedule AppointmentMark Appointment DoneCancel AppointmentSet Appointment PendingEdit AppointmentDelete AppointmentOpen Attached ContactNew Contact To DoOpen Prospect DetailsSet Contact To Do As 'Done'Set Contact To Do as 'Pending'Edit a Contact To DoReschedule Contact To DoDelete a Contact To DoCancel a Contact To DoNew General To DoSet General To Do 'Done'Set General To Do 'Not Done'Delete a General To DoNotesMy AccountAdmin ConsoleUser ConsoleTerms & ConditionsAdditional Information
New Appointment (Calendar Day View)
An appointment is an arrangement to contact or meet with someone at a
particular time or place. It can refer to various scenarios, such as
a doctor's visit, a business meeting, a phone call, or a Zoom meeting,
where two or more people agree to meet at a scheduled time.
Follow the directions below to create a new appointment in the
OA Mobile Calendar using |Day View|.
- From the |Navigation Bar|, select |Calendar|.
- Select |View| → |Day View|.
- Select the |Add Appointment| button.
- Select a contact to associate with the appointment.
- If the contact is not listed in your |Recently Viewed Contacts|, select the |Search Contacts| button.
- Enter the appointment details.
- Select the |Save| button to save the appointment.
- The appointment will appear in the |Appointments| section on the selected date and time.
-
To manage the appointment:
- View the appointment details by selecting the appointment.
- Open the associated contact by selecting the |Contact| button.
- Mark the appointment as completed by selecting the |Done| button.
- Reschedule the appointment by selecting the |Reschedule| button.
- Edit the appointment by selecting the |Edit| button.
- Delete the appointment by selecting the |Delete| button.
- Cancel the appointment by selecting |Cancel Appointment|.

Note:
- To create an appointment without linking it to a contact, select |Do Not Link to a Contact|.
- To search for contacts not listed in your |Recently Viewed Contacts|, select |Search Contacts|.
- To create a new contact for the appointment, select |Add New Contact|.
An appointment is an arrangement to contact or meet with someone at a
particular time or place. It can refer to various scenarios, such as
a doctor's visit, a business meeting, a phone call, or a Zoom meeting,
where two or more people agree to meet at a scheduled time.
Follow the directions below to create a new appointment in the
OA Mobile Calendar using |Day View|.
- From the |Navigation Bar|, select the |Calendar| drop-down arrow.
- Select |Day|.
- Select the |Add Appointment| button.
- Select a contact to associate with the appointment.
- If the contact is not listed in your |Recently Viewed Contacts|, select the |Search Contacts| button.
- Enter the appointment details.
- Select the |Save| button to save the appointment.
- The appointment will appear in the |Appointments| section on the selected date and time.
-
To manage the appointment:
- View the appointment details by selecting the appointment.
- Open the associated contact by selecting the |Contact| button.
- Mark the appointment as completed by selecting the |Done| button.
- Reschedule the appointment by selecting the |Reschedule| button.
- Edit the appointment by selecting the |Edit| button.
- Delete the appointment by selecting the |Delete| button.
- Cancel the appointment by selecting |Cancel Appointment|.
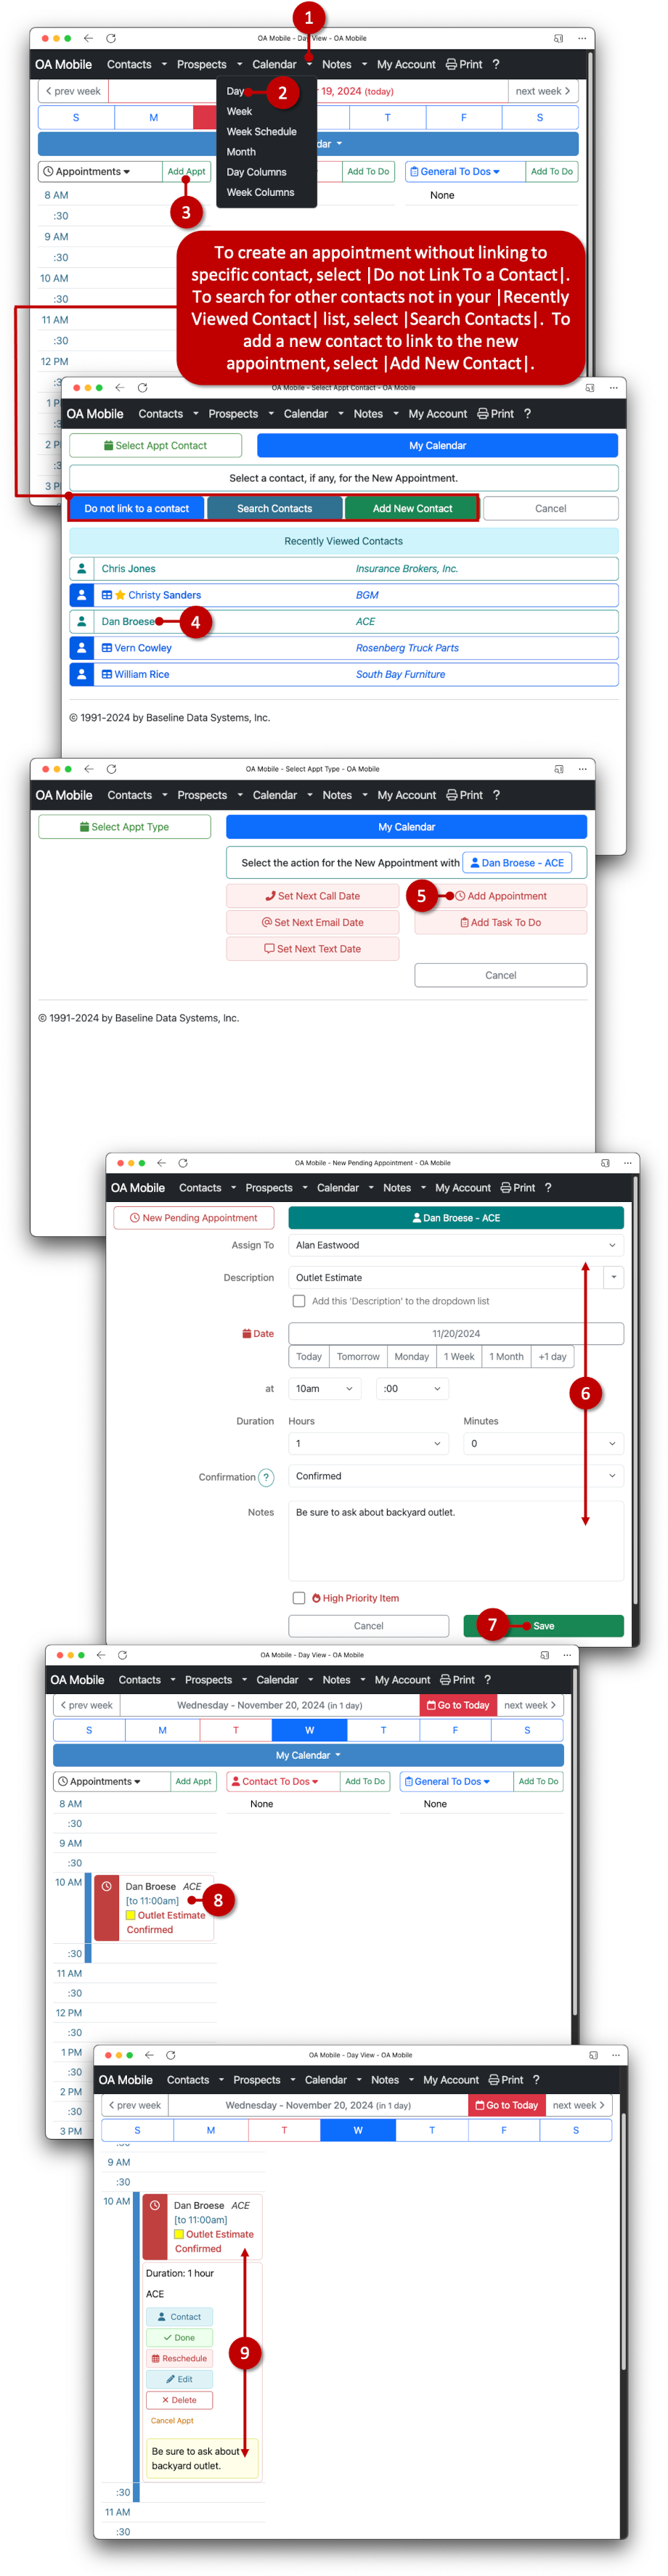
Note:
- To create an appointment without linking it to a contact, select |Do Not Link to a Contact|.
- To search for contacts not listed in your |Recently Viewed Contacts|, select |Search Contacts|.
- To create a new contact for the appointment, select |Add New Contact|.
© 1991-2026 - Baseline Data Systems, Inc.