Prospects
The |Prospects| option provides access to the OA Mobile Prospect Management features, including |Reports|,
|Spreadsheet|, |Call List|, and more. Selecting |Prospects| from the |Navigation Bar| displays the
Spreadsheet and its functions, including the |Prospect Console|, which provides three buttons for easy
navigation between your Reports, Spreadsheet, and Call List. All three features work together to help you
and your sales team close sales more efficiently. The OA Mobile App provides the same functionality
available in OA Mobile Desktop. To view additional spreadsheet information on smaller devices, simply scroll
the spreadsheet to the right. You may also use landscape mode to provide extra screen space for your
spreadsheet data.

- A: The |Prospects| option on the Navigation Bar opens the OA Mobile Prospects spreadsheet by default. The |Prospects| option remembers your previous selection and returns you to that same section the next time you select it. For example, if you left off on the |Reports| screen, the |Prospects| option will return you to |Reports|.
- B: The |Prospect Management Button Bar| provides access to |Reports|, |Spreadsheet|, and the |Call List|.
- C: The spreadsheet dropdown arrow provides access to spreadsheets owned by other OA Mobile users.
- D: Pages can be used to help organize your |Prospect Spreadsheet|. The |Page: Prospects| button allows you to create additional pages within your Prospect Spreadsheet, where you can add and separate prospects. Pages help partition your prospects so you can stay organized and productive.
- E: The |Filter| button provides advanced searching capabilities identical to those found in |Contact| searching. Selecting this option opens the Contact Search screen, where searches are limited to your spreadsheet and results are displayed within your |Prospect Spreadsheet| based on your search criteria. When a filter is activated, the |Filter| button is displayed in Red, and the type of filter applied to your spreadsheet is displayed to the right of the filter button.
- F: The |Add to Spreadsheet| button provides options to add existing contacts or new contacts to your spreadsheet. When adding a new contact, OA Mobile checks whether the contact already exists and provides options to use the existing contact or add a new one.
- G: The |Show High Only| button filters your spreadsheet by prospects marked as |High Importance|. Prospects with high importance are shown with a gold star. To add or remove high importance, select the star to the left of the prospect. This action toggles between Normal and High Importance status.
- H: The |Add Category| button provides the option to add an existing category of contacts to your Prospect Spreadsheet.
- I: The |Rate Calls| button is used to rate your phone calls with prospects. Rating calls helps you and other OA Mobile users focus on prospects showing the most interest. Rated calls are also displayed in |Reports|, which provide live links to display the list of rated calls within your spreadsheet.
- J: From left to right, the |Contact| button provides details about the prospect. Prospects displayed in Blue are currently on your spreadsheet, and prospects displayed in Purple are on both the spreadsheet and Call List. The phone, email, and text icons are used to call, email, and text prospects, respectively. Each action is logged within OA Mobile, and each correspondence can be saved as a template for later use with all prospects. Templates can use merge fields, making them reusable throughout OA Mobile. For example, "Dear {First Name}," would merge the prospect's first name into a greeting email or text message. The last two icons are used to add or remove the prospect from the Call List and set the priority level. When the phone icon is Purple, the prospect has been added to the Call List. When the star is Yellow, the prospect has been marked as high priority.
- K: The |Prospect Spreadsheet Columns| provide sorting options for First, Last, Company, Opened, Last Contacted, Next To Do, and Goal. When selected, the sort button turns Solid Green, indicating that the sort function is in use and prospects are sorted by the selected option. In the OA Mobile App, you may need to scroll to the right to view additional sort columns.
- L: Displays the number of days since the prospect was last contacted. This helps prevent prospects from falling through the cracks or becoming stale.
- M: The |Expand All| option expands the Prospect Spreadsheet to provide a more detailed view of each prospect. Toggling this button will |Expand All| or |Collapse All|.
- N: Use this option to move a prospect to another spreadsheet page or user.
- O: Use this option to close and remove the prospect from your spreadsheet.
- P: Provides a legend describing spreadsheet icons, including Key Info, Goal, Source, Opportunity, High Importance, Pipeline Goal, and colors that identify prospects on the spreadsheet and prospects on both the spreadsheet and Call List.
The |Prospects| option provides access to the OA Mobile Prospect Management features, including |Reports|,
|Spreadsheet|, |Call List|, and additional features. Selecting |Prospects| from the |Navigation Bar|
displays the Spreadsheet and its functions, including the |Prospect Console|, which provides three buttons
for easy navigation between your Reports, Spreadsheet, and Call List. All three features work together to
help you and your sales team close sales more efficiently.
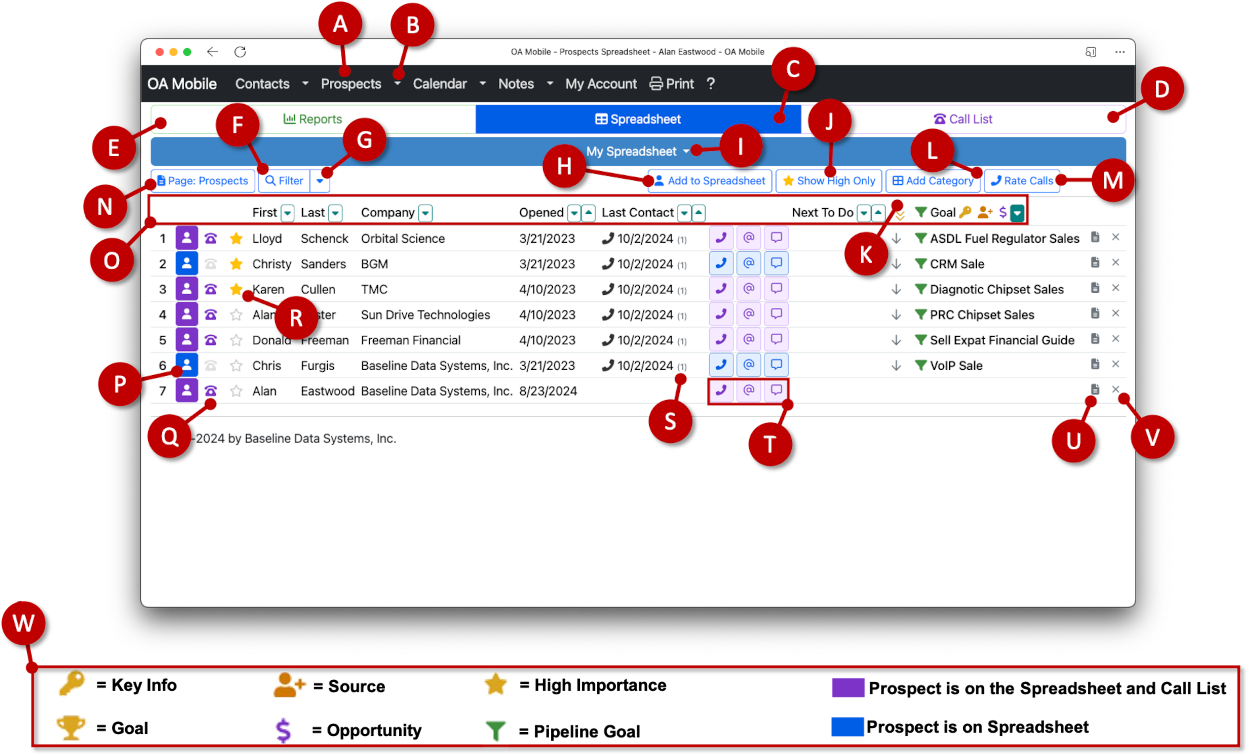
- A: The |Prospects| option on the Navigation Bar opens the OA Mobile Prospects spreadsheet by default. The |Prospects| option remembers your previous selection and returns you to that same section the next time you select it. For example, if you left off on the |Reports| screen, the |Prospects| option will return you to |Reports|.
- B: The |Prospects| dropdown list provides quick links to |Spreadsheet|, |Call List|, |Reports|, and |Rate Calls|.
- C: The |Spreadsheet| button provides quick access to your Prospect Spreadsheet.
- D: The |Call List| button provides quick access to your Call List.
- E: The |Reports| button provides quick access to your Prospect Reports.
- F: The |Filter| button provides advanced searching capabilities identical to those found in |Contact| searching. Selecting this option opens the Contact Search screen, where searches are limited to your spreadsheet and results are displayed within your |Prospect Spreadsheet| based on your search criteria. When a filter is activated, the |Filter| button is displayed in Red, and the type of filter applied to your spreadsheet is displayed to the right of the filter button.
- G: The |Filter| dropdown list provides a history of your most recent search filters for convenient access. From the dropdown list, you may also select |Clear All Filters| or begin a new search filter.
- H: The |Add to Spreadsheet| button provides options to add existing contacts or new contacts to your spreadsheet. When adding a new contact, OA Mobile checks whether the contact already exists and provides options to use the existing contact or add a new one.
- I: The spreadsheet dropdown arrow provides access to spreadsheets owned by other OA Mobile users.
- J: The |Show High Only| button filters your spreadsheet by prospects marked as |High Importance|. Prospects with high importance are shown with a gold star. To add or remove high importance, select the star to the left of the prospect. This action toggles between Normal and High Importance status.
- K: The |Expand All| option expands the Prospect Spreadsheet to provide a more detailed view of each prospect. Toggling this button will |Expand All| or |Collapse All|.
- L: The |Add Category| button provides the option to add an existing category of contacts to your Prospect Spreadsheet.
- M: The |Rate Calls| button is used to rate your phone calls with prospects. Rating calls helps you and other OA Mobile users focus on prospects showing the most interest. Rated calls are also displayed in |Reports|, which provide live links to display the list of rated calls within your spreadsheet.
- N: Pages can be used to help organize your |Prospect Spreadsheet|. The |Page: Prospects| button allows you to create additional pages within your Prospect Spreadsheet, where you can add and separate prospects. Pages help partition your prospects so you can stay organized and productive.
- O: The |Prospect Spreadsheet Columns| provide sorting options for First, Last, Company, Opened, Last Contacted, Next To Do, and Goal. When selected, the sort button turns Solid Green, indicating that the sort function is in use and prospects are sorted by the selected option.
- P: The |Contact| button provides details about the prospect. Prospects displayed in Blue are currently on your spreadsheet, and prospects displayed in Purple are on both the spreadsheet and Call List.
- Q: Use this option to add or remove the prospect from the Call List. When the phone icon is Purple, the prospect has been added to the Call List.
- R: Use this option to mark the prospect as normal or high priority. When the star icon is Yellow, the prospect has been marked as high priority.
- S: Displays the number of days since the prospect was last contacted.
- T: These options are used to call, email, and text prospects, respectively. Each action is logged within OA Mobile, and each correspondence can be saved as a template for later use with all prospects. Templates can use merge fields, making them reusable throughout OA Mobile. For example, "Dear {First Name}," would merge the prospect's first name into a greeting email or text message.
- U: Use this option to move a prospect to another spreadsheet page or user.
- V: Use this option to close and remove the prospect from your spreadsheet.
- W: Provides a legend describing spreadsheet icons, including Key Info, Goal, Source, Opportunity, High Importance, Pipeline Goal, and colors that identify prospects on the spreadsheet and prospects on both the spreadsheet and Call List.
Subtopics
© 1991-2026 - Baseline Data Systems, Inc.